
Manage Your Nude Photos . . . and Share Them
Important Notice: Although I have recommended Flickr in good conscience, I now have to retract that recommendation because of my recent experiences with Yahoo and their ability to cancel all your services for no stated reason if they feel you have violated their Terms of Service. I recently had my Yahoo account terminated because (as best I can tell) I didn't update a GeoCities web page I had experimented with and abandoned years ago. Yahoo just unilaterally cancelled me with the consequence that the only way to log into Flickr (a separate service) is no longer available. In other words, the paid for Flickr Pro account is still there but I have no way to log in and manage it. Use Flickr with extreme caution . . . YaHell has a bad habit of cancelling people on the most frivolous of reasons and then refusing to communicate with you to find out why.
When I head out to the mountains I take a lot of images of the surroundings and what I'm experiencing. I also a lot of pictures of myself framed within those settings so that I can relive the experience at other times when I don't have the time or luxury to just shuck it all and enjoy nature. At nude resorts, beaches and the like, picture taking is limited out of respect for others. I don't mind being seen naked on the web but others certainly have valid reasons to expect (or desire) privacy. But in the wilderness, amongst all that beauty, I click away like mad. How do you manage all those images? How do you share the ones you want others to see and get some idea of the enjoyment you experienced that day?
This blog is one way . . . my primary means of sharing a naturist journal. Yet a blog is mainly a writing tool depicting a lineal passage through time . . . the reader travels with you as you go from one experience to the next. Seeing where you've been . . . what experiences excited you in the past is best done with a photo album. A little bit of planning makes this process easier:
- Organize and manage your photos with a program like Picasa Photo
- Sign up for an Online Photo Storage account like Flickr. Give some thought to how you would lay collections and sets out
- Batch edit the image metadata of your photos using a program like Exifer or PhotoMe
- Cleanup and enhance your images with your favorite editor
- Consider copyright and the use of your images
- Geo-locate your images using GeoSetter
- Upload your images to Flickr
Organize Images on your Computer
 Picasa Desktop Photo Organizer
(showing the photo editing pane - "warmify" adjustment)
Get an Online Photo Account
My experiences with online photo albums have been mixed in the past, and for me the judgment of 'best' is still out. Blogger (this service from Google) uses Picasa with a sizable amount of storage. I've been happy with Picasa (both the online and desktop interfaces that do a good job of sorting and categorizing my photos) but recently I've come back to Yahoo's Flickr service as that service matures and provides better control of who sees content . . . the so-called Permissions and Safety Filters. It used to be difficult to share photos containing nudity on Flickr but now you can set a Safety rating of Safe, Moderate, or Restricted and Flickr will allow access to your images depending on the visitor's stated level of content they are willing to view and the Permissions you have assigned. Safe, of course, means no one is going to have a problem with the image. Restricted is for stuff that is likely to 'offend' and probably belongs on a porn site and not a widely-popular sevice like Flickr. Moderate is in-between and is fine for images of simple nudity. With images assigned Permissions and a Safety rating when I upload them, I'm pretty much assured that those who view my images are not caught off-guard by the nudity that I consider an essential part of the journey. I don't like the fact that my images have to be 'filtered' but that's far better than the old system of requiring all nudity to be locked up in private sets viewable upon invitation only. The new system puts the onus on the uploader to correctly categorize their photos as Safe, Moderate, or Restricted; and the viewer setting a Safety Filter. Lacking a viable alternative I can live with Flickr's TOS.
With that in mind, a Flickr Pro account in hand and the slick Flickr Uploadr program running on my computer I can pretty much open my photos to the world and share. Yeah, sure you can organize all that content into collections and sets, add descriptive titles and short descriptions but how does someone out there find an image that they might be interested in? That's where the real power of sites like Flickr come in in their power to access a little known feature of digital images . . . the metadata that is saved by your camera when you take a picture. Flickr accesses (with permission) this data to tag your images and make it easier for people to search based on those tags . . . info such as date the image was taken and location if geotagged. Tags can also be added interactively to images after-the-fact on Flickr. A neat aspect of Flickr is the ability to geotag your images on a map for a different view of you collections and sets. Another neat (and essential aspect of tags) is that you can have keywords of what kind of subject matter attached to the image . . . if an image contains nudity a keyword can so state and allow filtering. An example bears out the possibilities (and yes, this example contains nudity . . . this is a nude blog, after all):

A title and description are always nice but on the right hand side is where you can add tags for your photos along with camera information, copyright restrictions and geo-referencing. You can do this to your images after they are uploaded to Flickr . . . or you can go a preferable route and edit your image metadata ahead of time and at your leisure using a few other programs available; notably Exifer and GeoSetter, open-source and freeware programs, respectively, that allow you to edit the metadata saved as part of your digital images. When you subsequently upload the image, Flickr will automatically generate tags based on that edited metadata . . . saving you a lot of time . . . plus the original images on your computer also have this information to allow some really serious drill-down searches locally. So the steps, using the same image as above: Both programs can edit in batches . . . i.e., all the photos taken on a particular trip . . . but I'll limit this short tutorial to one.
Use MetaTags to your Advantage
Use MetaTags to your Advantage
Exifer is slated mainly to edit EXIF and IPTC data in image files . . . metadata about the camera settings and descriptive keywords contained within the image file. Few people realize the amount of information that is saved with a digital image file. When I worked a computer forensics stint many years ago, if we had an incriminating image file the first place we looked for clues was within the EXIF metadata . . . the make and model of camera, serial number, date taken, etc. Many photo editing programs corrupt or even change some of this data but if the editor is launched from within Exifer that program will automatically make backups and restore the metadata after editing. Certain EXIF metadata is difficult to edit or change (with a few exceptions) but the IPTC data is fully intended to be used and edited. This is where Exifer shines.
 Exifer . . . editing the IPTC Metadata of the image
The extent of data you enter is up to you. I add contact information, including my blog URL, a copyright notation (which I also have added to EXIF) and Category and Sub Category (NAT for Naturism, and Nude Hiking as a sub category for this batch of images) and sufficient keywords (which Flickr will turn into Tags) to adequately characterize this image. You can create templates and use them to pre-load keywords . . . for example, I have a template that loads keywords for images that contain nudity (i.e., Nude, Naked, Nudism, Naturism). These keywords are important to later exclude an image from safe searches. A general good rule of thumb (especially for images uploaded to Flickr where the tag-cloud is a primary way of finding images) is to:
- Keyword where (Index-Galena, Sunset Mine, Wild Sky Wilderness, Trout Creek, Washington, Cascades)
- Keyword the activity (cold weather nude hike)
- Keyword a time frame (Dec 2008)
- Keyword features (old log bridge, old mine site)
- Keyword the nudity factor (nude, naked, nudism, naturism) though a Safety Flag of Moderate will keep those images from unexpected eyes (Flickr's "Take Me To The Kittens")
If you want to add a detailed description of the image you may do so in the Jpeg Comment tab . . . Flickr will use this for you image description if it exists. One final step is to ask Exifer to create embedded thumbnails of your images. These thumbnails are saved as part of the image file and do not add appreciably to the file size. Your operating system can use the embedded thumbnails instead of creating them on-the-fly later on. EXIF/IPTC metadata and embedded thumbnails are preserved as part of the image file. If you copy and save the file that metadata is still there waiting to be set free (screen copies of an image, however, do not carry metadata across . . . and, of course, they lose a lot of the original image's resolution).
Another option to consider is PhotoME (ME for metatag editor). PhotoME will allow you to fine-tune your metadata much like Exifer. Like Exifer, PhotoME is free.
 PhotoME Metatag Editor gives fine granular control over tags
Cleanup and Enhance your Images
Once I have my metadata in shape I will launch my favored photo editor from within Exifer. The reason for this is because Exifer will save an image's metadata and restore it after editing is done. As noted above, many editors do change the metadata or add their own information. My favorite editor is G.I.M.P. but use whatever one you like.
 The Gnu Image Manipulation Program (G.I.M.P)
Today's digital cameras are pretty faithful in recording the image as you see it. However, some manipulation will clean up slight color imbalances, blur and out-of-focus images. The G.I.M.P. Heal Tool is a one-step process to auto-correct images. Many other effects are available . . . this program is fully functional, open-source, and FREE! However, it does have a steep learning curve.
Picasa from Google, which can also organise and manage your photos on your computer, also has a photo re-touch function . . . easy, one-click fixes to many common problems; and enhancements like to color balance filter to warm up the colors in an image like the effect on the first screenshot at the beginning of this article. Picasa is also free from Google.

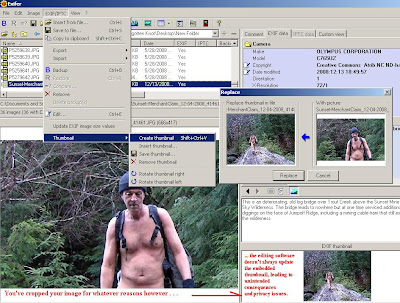
Update your thumbnails to avoid surprises
We may not want to show everything portrayed in an image, yet share that image with others. We will crop images, perhap blur out faces to protect the privacy of others. Yet not all photo editing programs update the embedded thumbnail to reflect these changes. You may be left with a thumbnail of the original image accessible by anyone. Such was the case of television personality Cat Schwartz (e.g. TechTV). Schwartz had published a photograph of herself on her personal blog. Because the program she used to edit the picture (Adobe Photoshop) did not update the thumbnail, the thumbnail revealed more nude facts than originally intended. If you edit your images significantly, use Exifer's capability to create (replace) the image thumbnail.
An additional note on editing JPeg images. The JPeg format is what is known as a lossy compression format. The image size is reduced to a manageable size by the reduction of image information that, presumedly, is not visible. Every time you save to the JPeg format you lose a little bit more of the image quality. So make all your changes first and then save. Or save to a lossless format such as a bitmap (BMP) if you must take a break.
Retain Rights to your Images
Exiting G.I.M.P. you are returned to Exifer and your metadata restored (assuming your have kept the default settings. Metadata is not readily available to a viewer of your photos and you may want to note some information (like copyright) up front. The process of doing this is called watermarking, as I've done on the example below, using Exifer. Of course, if someone wants to steal your image and use it as their own it is a simple matter to crop the image and leave the visible watermark out . . . though they'd have to go a step further and edit or strip the EXIF/IPTC metadata encoded within the image file if they wanted to be complete.
 The image with a watermark applied in the lower-right corner
There are more elaborate solutions to protect your images if you are willing to pay a price. One of them is called Digimarc which inserts an invisible digital watermark as part of the image. You can't see it but a plug-in for Adobe Photoshop can read and write those watermarks. Digimarc primarily sells a tracking service that crawls the web noting where images with embedded digital watermarks are located, telling you if any of yours are posted out there, presumedly without your permission. Unless you have high-value images which you need to protect I don't see the value of digital watermarking that can only be done with the expensive Adobe Photoshop suite; and the added cost of tracking your images for a steep $80 per year does not seem like a good value to me. Likewise the value of a visual watermark may or may not be appropriate for you . . . for me, I prefer to keep my images unadorned with extraneous text.
On the issue of copyright and image ownership, you could just simply state copyright and be done with it. The image is yours and a conscientious user would ask permission before using or posting it somewhere else. No copyright within the metadata and you'd have a difficult time demanding someone take down your image if it were being used inappropriately. However, standard copyright also hinders the sharing of your photos.
One option that is becoming very popular is to use a new copyright convention called the Creative Commons License.

This work by bangedupshins@gmail.com is licensed under a Creative Commons Attribution-Noncommercial-No Derivative Works 3.0 United States License.
Permissions beyond the scope of this license may be available at http://nudehiker.blogspot.com.
Permissions beyond the scope of this license may be available at http://nudehiker.blogspot.com.
With the Creative Commons license, you state and retain ownership of your image but you also grant certain usage rights up front. For example, all my images have been tagged (using Exifer) as CC Atrib NC ND bangedupshins@gmail.com. What I am doing is stating that:
- This image is covered by a Creative Commons License
- The image belongs to me
- The image can be used with Attribution
- No commercial uses may be made of this image, and
- No derivative works may be made of this image
Add Location Information to your Images
Perhaps the funnest part of Web 2 Photo Sharing is geo-tagging your images so that others can see where they were taken. For geolocation I like to use a nifty freeware program called GeoSetter. GeoSetter can also edit your EXIF/IPTC metadata but it's main purpose is to add geographical lat and logs to your image so that they can be displayed in applications like Google Maps and Flickr Maps. GeoSetter can add geolocation by importing tracks from GPS receivers, or you may manually note a location by clicking on an interactive Google map.
 The GeoSetter interface importing the
images' location from my GPS receiver
Using the interactive mode by clicking on the map is intuitive and easy . . . assuming you remember where you took the photograph. Attaching your GPS receiver and importing a GPS track takes a little bit of planning . . . and adjustment, but is more accurate, faster on a large group of images, and also adds a bearing that applications that support this datum can use to indicate what direction the camera was pointed.
The planning part means you have to insure your GPS receiver and the digital camera have synchronized times. They rarely do so I take a reference picture with a GPS waypoint and later use the GeoSetter dialog boxes to set an offset to be applied. This keeps all the images synchronized with the times on the GPS track.
 The location coords are added as metadata to the image
Upload your Images to your Online Photo Account
 The Flickr Uploadr
When you start Flickr Uploadr to upload your images to Flickr, the program will scan the EXIF and IPTC metadata of your images and automatically insert appropriate tags for your images. Any additional tags you insert here will appear on Flickr but will not become part of the metadata of the original images. Also on this page you can select a set (or create a new one), permissions (who can see them), safety level (at least moderate if there is any nudity), and a title and description for the images. You can work in batch, selecting more than one image, or enter the information for each image one by one.
Once uploaded you can rearrange and perform minor adjustments to make you images more accessible. Tags, titles and descriptions will be automatically generated for you based on the EXIT/ITPC metadata saved with each file. Any photos that have been geo-coded will get added to your Flickr Map (if you've enabled this feature) and viewable depending on the Safety and Permissions for this image.
 The same image now plotted accurately on my Flickr Map
Now get to work and start sharing your own memories of nudism with others.
Once uploaded you can rearrange and perform minor adjustments to make you images more accessible. Tags, titles and descriptions will be automatically generated for you based on the EXIT/ITPC metadata saved with each file. Any photos that have been geo-coded will get added to your Flickr Map (if you've enabled this feature) and viewable depending on the Safety and Permissions for this image.
 The same image now plotted accurately on my Flickr Map
My Nude Hiking Flickr Photostream may be accessed at:
http://www.flickr.com/photos/bangedupshins.
Unless you have a Flickr account and are logged on, you can only view images marked as 'Safe'.
A Flickr mashup called FlickrRiver is an alternative viewing method that will likewise display images marked 'safe'. You still have to log into a Flickr account to view images containing nudity and marked as 'moderate'.
Anyone who has a Yahoo account can signup for a Flickr account in moments here.
Don't want to sign up for Yahoo or Flickr? View the images (nude or not) with this Guest Pass.
Enjoy the photos . . . please feel free to comment on them (constructively and with good intentions). Comments let me know that people enjoy riding along with the adventure and perhaps come to know that nude is not lewd.
Enjoy the photos . . . please feel free to comment on them (constructively and with good intentions). Comments let me know that people enjoy riding along with the adventure and perhaps come to know that nude is not lewd.
Now get to work and start sharing your own memories of nudism with others.
Tags:


|